Request a Consultation
Ready to upgrade your digital marketing systems but unsure where to start? Complete this form to request a preliminary evaluation of your current systems. We will reach out to schedule an introductory meeting.

Everyone thinks about brand “image,” but rarely does anyone consider brand sound. Audio is all over your brand, and I’ll bet you’ve barely thought twice about it. Between webinars, product videos, podcasts, and more, branding is a more auditory experience than ever before. Sound content comes in two basic forms – music and voiceover. Both have branding considerations.
Telephone on-hold music is a branding choice, not a throwaway decision. Cohesion in your music selections across all brand content will solidify your customers’ perceptions of the image you choose to portray. When you think of your brand, you should be able to picture an individual person. Is this person younger or older? Is he carefree or serious? Is she emotional or analytical? If you can’t visualize your brand as a person, take a step back and work out your brand’s archetype.
Now that you’re imagining your brand’s archetype, what kind of music does she listen to? What can’t she stand? She might listen to a few different genres to mix things up, but she is going to have distinct preferences just as we all do. Match her musical preferences to your background music across all content. And start with your hold music. This is the single most impactful change that music can make on your brand perception. Don’t be tempted by your own favorite music. While your brand archetype may very well be an extension of your personality, it probably doesn’t match you note for note. My favorite band is Pearl Jam, but JCM’s brand is not rock and roll. JCM is the sorta-cool geeky guy that you’re always calling to ask tech questions because you’ll get an even better answer than if you Google it. He listens mostly to electronic pop and likes superhero movies.
Homemade-looking video has become increasingly acceptable for brand content. As the demand and expectation for video content has increased, mostly because of YouTube, brands have started to embrace DIY, low budget video production. Consumers accept it because that’s the style of content that they’re used to seeing online. However, as YouTube has become more saturated and folks have made content creation their full-time career, quality of content on YouTube has increased dramatically in the last few years. When most people think about stepping up their video content game, they invariably think about a better video camera, lighting, backdrops, maybe even buying a drone for some money shots. Maybe it’s just because I’m an audio engineer on the side, but to me (this is Jeff writing), bad looking video is more acceptable than rotten sounding audio. Polished-sounding audio will increase the professionalism of your video content faster and for less investment. Here’s where to start:
Buy a quality microphone. A Shure SM7b ($400) if the gold standard for broadcast quality vocal mics. It is a classic condenser microphone, and as such, it will need a powerful preamp and a digital audio interface. Audio interfaces (around $100 for a basic 2-channel) come with preamps, but they aren’t all powerful enough to run the Shure SM7b. If your audio interface provides less than 60dB of gain, you’ll either need an outboard pre-amp or an inline signal booster, such as the Cloudlifter ($150). If you don’t want to mess with extra components, the best USB mic on the market is the Blue Yeti Pro. ($269).
Nothing is more annoying than eardrum assault by exploding consonants like B’s and P’s. A pop filter is a cheap ($20) addition to your microphone that will instantly make everything sound more professional.
Leave reverb to music producers. No one wants to hear the sound of your room. Rooms sound terrible. In fact, in music, reverb is almost all fake and added after the instrument or voice was recorded as dry and dead as possible. Acoustic room treatments can get really expensive, but you don’t have to bother with all that for voiceover. Just get closer to the microphone. 6 inches max, but if you’re using a Shure SM7b, you should basically be eating it. Getting close to the mic does two things, it means you need less gain to get your level, and the room sound will be dramatically reduced by default, and the proximity effect of the microphone will add some sexy bass to your voice.
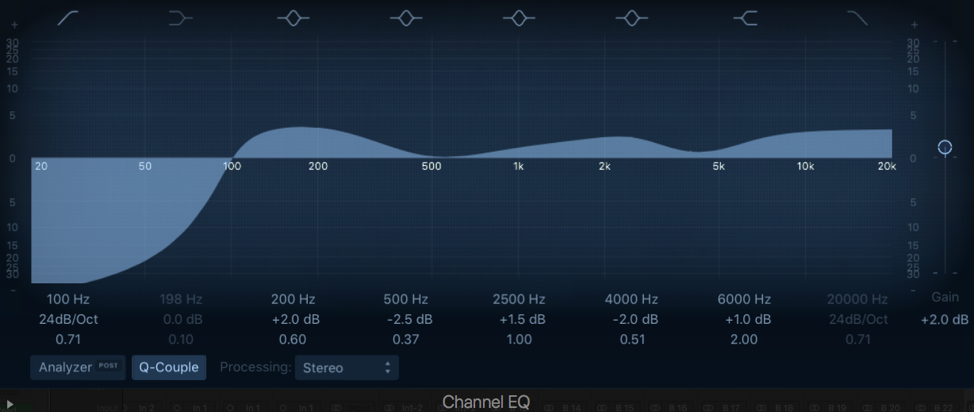
The added bass from the proximity effect is a nice added touch, but it’s likely more of a slap than a touch, so clean up your recorded vocal with EQ. Here are some general use settings. Voices differ, but these will work for just about anyone if you’ve recorded the voice nicely at about 6 inches away. High pass (low cut) everything below 100Hz. Do a little resonance boost at 200Hz. Dip some of the mids out with a center at 500Hz and a wide Q. Give a little boost around 2.5K. Notch out a little bit around 4K because this is where nasal harshness lies. Finally, add some presence with a high shelf above 6K. These edits look like this:

EQing voiceover is especially important if your voiceover is being placed on top of an underlying music track. For music under a voiceover, instrumental is best because your voice will not be competing with the singer’s for coveted spots in the frequency range. For even better cohesion between the music track and the voiceover, apply an EQ to the music track and notch 2-3 dB out of the 200Hz and 2K bumps that you boosted in the voiceover. This will give the important frequencies in the voiceover a pocket in which to sit on top of the music track.
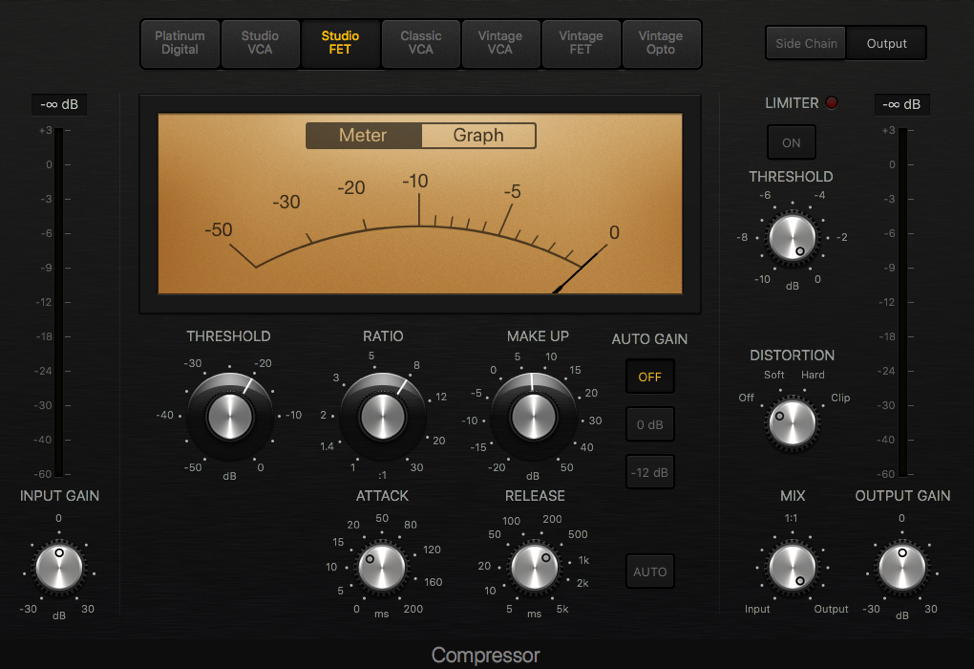
Compression makes everything sound sexier when it’s applied correctly. The way compressors work is they respond to an incoming audio signal, and when a signal goes over a set dB threshold, it pulls the level down. This decreases the overall dynamic range of the audio, creating a more consistent level. The voice is an extremely dynamic instrument, and compression will immediately make your voiceover more professional sounding. The main controls of a compressor are threshold (when to trigger the squish), ratio (how much to squish), attack (how soon after the threshold is crossed to squish), release (when to let go of the squish), and make up gain (turns everything back up after squishing the loud bits). The threshold is always going to vary depending on how hot the signal is running into the compressor, but in general, you want to see around 6 dB of gain reduction on the meter during the loudest parts. Here’s a good compressor setting for voiceover on one of the stock compressors in Logic Pro:

Once you start learning how the various frequencies sound across the spectrum, you can perform more surgical cleanups on badly recorded content. The easiest way to diagnose the trouble spots is to take one of the EQ filter bells (the ones in the middle, not the cuts or shelves), boost it way up, and sweep it around until you hear the offensive frequency ranges, then drag the EQ bell down to notch those out. If this all seems like too much trouble, there is an amazing plugin called SoundSoap by Anteres (the makers of everyone’s favorite annoying vocal effect – Auto-Tune). SoundSoap will listen to your audio, find the noise, and filter it out automagically. It’s a really remarkable piece of software for $150. It works as a standalone application or as a plugin for DAW (digital audio workstation) or video editing software
Blue Yeti Pro Microphone, Unprocessed
With EQ Correction
With EQ and Compression
EQ’ed and Compressed, over Unedited Music
EQ’ed and Compressed , over EQ Notched Music (6 dB notches at 200Hz and 2K)
…and most other CRMs that allow you to create custom fields. Request a consultation below to discuss your CRM needs.
…and most custom forms that allow hidden fields and don’t utilize cross-domain iFrames. Request a consultation below to discuss your contact form needs.
Ready to upgrade your digital marketing systems but unsure where to start? Complete this form to request a preliminary evaluation of your current systems. We will reach out to schedule an introductory meeting.
Our first step is a 30-minute digital marketing consultation to explore whether we’re a good match and create a customized plan of action.